Showing posts with label Science. Show all posts

Sunday, August 30, 2015

Books for Human Body Lessons

We've been doing a human body theme in our homeschool preschool right now and I wanted to make a list of some of our favorite human body books if others are looking for good ones to add to their homeschool libraries. 

On the first day of the theme I put all these books out on display.


These books are so great for my daughter to learn about her body with. 

We read about baby brains at our outside classroom area and brought a baby doll with us for the fun of course. My daughter loves everything to do with babies so this was a particularly interesting lesson for her.


On the day we were going to be reading the Respiratory System book I wrote a morning message about how we have bronchioles in our lungs, I was so proud of how my daughter copied down her new big science vocabulary word. 


I hope you can have some similar great experiences with these books!

Wednesday, August 12, 2015

Nature Study Rock Drawing

As part of our preschool schedule we have Nature Study. My daughter has a science journal that we also use for our nature study since that is a part of science. In this journal she draws and records her experiments and nature findings. Yesterday we went out and gathered some rocks that she then inspected with her magnifying glass, and drew in her science journal.

I let her pick the rocks and use the magnifying glass all on her own, but we would talk about the different colors of the rocks, and how some would have "spots" on them and thought about what they could be. This is a very simple introduction to rocks activity in the beginning of a rock themed nature study/science unit I plan on beginning.


I will always cherish her drawings from preschool. These are her renditions of the rocks she found and looked at.

I hadn't yet when I took this picture, but if you do the same type of thing with your child be sure to add the date and maybe a quick summary of what you guys were doing so you always remember. Any quotes from your kids would also be great, and for older kids they can write their own description of the rocks.

Friday, May 22, 2015

Frog Life Cycle Pond Sensory Bin

As part of our Habitat Series we're doing right now we are doing a unit on the habitat of the pond. Frogs live in ponds, and knowing the life cycle of a frog is important animal knowledge. So I made this sensory bin/small world that shows the life cycle of a frog in a cute and interactive way. Kids can play with it while learning and experiencing fun tactile sensory materials. 


To make this sensory bin/small world I first made a batch of blue homemade playdough to represent the water. My favorite homemade playdough recipe goes as follows:

1 cup of water
1 cup of all purpose flour
1/4 cup salt
1 tbsp oil
1 tbsp lemon juice
blue food coloring (for this batch)

Mix them all together in a pot with a wooden spoon and then put it on the stove on medium heat and stir it constantly until it forms a ball, transfer it to a bowl, knead it until it is no longer sticky once it is cool enough.

Now, to make the bin look like the pond how I wanted I put the blue playdough down into more than half of the surface of the bin, stuck some small rocks into the edge for a border, and then poured some dry split peas into the remaining surface area of the bin. After that all there was to do was to put the life cycle of a frog pieces into the bin. I also added a little plastic fly we have to discuss how frogs eat flies. We also watched a video afterwards of a frog eating flies to connect the concept and make it more real.

You can buy the frog life cycle here  to make this bin or to use for your own educational activities.

Make sure you interact with your child(ren) as they play with this bin and explain the stages of the frog life cycle and the differences between each. Every day of the pond unit after we did this bin I am having my daughter show me the frog life cycle in order on her own.

Sunday, January 25, 2015

Sparkly Fizzing Heart Science

We used a heart bowl from Dollar Tree today to make some Sparkly Fizzing Heart Science reactions! It was so much fun and could be done over and over again. Kids always love the baking soda and vinegar reactions no matter how they are done, and with a Valentine's theme it's even more fun and exciting.
I let my daughter pour the vinegar so she is creating the reactions. I would put about a 1/4-1/2 of a cup into the measuring cup at a time so we could do it again and again.


It looked beautiful!

You will need:
- A big plastic heart bowl
- Glitter
- Baking soda
- Vinegar
- Pink food coloring
- Measuring cup

Just put the baking soda in the bowl, let your little one sprinkle on some glitter, and add a few drops of neon pink food coloring on top. Let them pour on the vinegar and watch the reaction take place again and again!

Tuesday, November 25, 2014

Apple Picking


One of our favorite things to do in the Fall is go apple picking. I consider it a home school field trip. This year we went with a play group that we're in. That made it all the more fun for my daughter since there was other kids for her to see and play with afterwards. But, even without the addition of a play date apple picking itself is super duper fun and educational!

Children love eating apples, and see you buy them from the store, but it's a different experience to see them on a tree like that. You can use this opportunity to explain how our food grows.


When you're done apple picking, be sure to let them enjoy eating the apples they picked! My favorite apple dip recipe is here 


Thursday, August 28, 2014

Color Mixing Water Play

Water play is a great way to beat the summer heat and almost all kids love it! This particular one we did last year was to teach color mixing. It was to show that when red and blue mix together they create purple. 

I set my daughter up outside with a bin full of water and two clear plastic cups one with red water and one with blue water. I colored the waters with food coloring, a few drops each. She poured in the red first!

Next went the blue, and the colors mixed to make purple. In the picture the water still looks blue but it was a lovely shade of purple in person.


After we did that and discussed the color theory and all that she started just playing with the water. Splashing around in it and then using the cups to scoop and pour the water from one to the other. Lots of summer fun!


Friday, July 25, 2014

Learning Bones With Dolls

I think that using a baby doll is a really easy way to make learning the parts of the body fun. We did this last fall when we were doing a unit study on bones. My daughter got a kick out of it and definitely retained the information. It's a little hard to show all the bones on a doll (such as the clavicle) but some bones can certainly be taught with one.

We used our Cinderella baby doll. Other than a baby doll, you'll need some Post-it Notes, scissors, and a Sharpie. We decided to focus on some bones in the leg. I took a few Post-it Notes and wrote down the names of the bones on the top (where the sticky part is,) cut them down to size, and then stuck them on the doll with my daughter.


As you can see we did the femur, patella, and tibia on the front side. This is a great way to learn the names of the bones in a fun way, like I said. But it is also great for kids in the emergent reader or even reading phase. This activity helps improve vocabulary and early literacy skills because it has the words written out to be read and seen.

Monday, June 16, 2014

Making a Rainbow in Your Own Backyard

Who doesn't love rainbows? We love rainbows here and it's one of my daughter's favorite activities to make her own. She also loves playing in the sprinkler, and since that's involved it's even funner!


What you need to make your own rainbow is a hose, a sprinkler attachment like this one, and of course sunlight! That's what makes it such a good science activity, you'll be able to explain to your child what is needed to make a rainbow and how it's usually done with the rain in the atmosphere. You can also discuss the colors that make a rainbow! So, once you've got your attachment on the hose and your kid all suited up, you just start the sprinkler play and experiment with when a rainbow will be made. We usually get a great one on the mist setting. 

This also makes a great photo opportunity as you can see in the photo above of my daughter. It looks as if she's running across a rainbow! Pictures of kids and rainbows are so cute, and easy to get when you can make your own on any sunny day. It's sure to wow your kiddo!

Sunday, June 1, 2014

Roses & Petals Water Play/Science

My daughter always enjoys water play, and so do many other kids. Finding new things to incorporate in our water plays always makes us happy. Rose petals make a great addition to a sensory bin that's filled with water. We had yellow and pink rose petals from my mother's day flowers so we used those.


I let my daughter have a chance to peel the petals apart and add them to the water.


This was a great sensory experience for her, and a good science lesson too. She took all the petals off of one rose and asked what the parts left over were called. We looked it up together and found out which part was the "hip" and which were the "anthers"


Once all the petals, and some whole roses were in the water she really enjoyed feeling them wet. She'd splash them around and say they were getting a bath. Then, more science was happening! We decided to talk about whether or not the petals and the roses floated. She also discovered she could squeeze some water out of the petals. So much fun!


Friday, May 9, 2014

What's in the Dirt? Science Lesson

I recently picked up this SID the Science KID DVD for my daughter. 
It features 4 episodes. One is about animal communication, one is about birds, one is about leaves, and one about dirt. This activity was us expanding on the episode about dirt and bringing what we learned to life with a hands on experience. I think any time kids can get outdoors is really beneficial, I believe the same for sensory play, and of course science is a very important subject for kids to gain knowledge on. This activity combines all three of those wonderful things. Hands on activities really do help kids learn so much better than when they just hear or see something during a lesson!

In the episode the kids collect some dirt in a bucket, pour it onto a tray, explore it with a magnifying glass, and then draw what the saw in their journals. We did the same thing!

To start, I had my daughter in her swimsuit doing some sprinkler play. We eventually used the sprinkler to get a section of dirt in our yard wet. This created mud! That in itself is a wonderful science and sensory experience for kids. When water is added to dirt it creates mud! How fascinating. Once it became mud I gave my daughter her Minnie Mouse cultivator and shovel. She used the cultivator to loosen up the mud a little bit and the shovel to get it into her bucket. Try and make sure your little one(s) doesn't get a bunch of grass their bucket, which is especially easy to do if they use a cultivator and put that straight into the bucket. You don't want that grass throwing off the result of what is IN the dirt.


Once the bucket had enough mud/dirt in it we took it over to her outdoor table, which had one of our plastic tot trays waiting on it, and dumped it out onto the tray! She started to touch it immediately, kind of flattening it down as if it was play dough. We used our hands and the cultivator to spread the dirt around on the tray so we could find out what was in it.


I encouraged her to use her magnifying glass to get a closer look. She was very eager to do so! This and other fun science activities are great for getting kids used to using magnifying glasses, which are a very important tool in the science world.

 
We found that our dirt, still a little wet, was very clay-like. I was able to roll it into a very smooth ball. My daughter thought that this was neat. We discussed the similarities some dirt has to clay.


We also realized that our dirt, at least what we got from the first inch or so of the ground really didn't have a lot of things in it. There was no little rocks, no worms, no different colors (things they found in their dirt in the SID the Science KID episode). We did see some little pieces of grass and what seemed like roots. After playing with the dirt for a while though, we did start to see some ants, and then we saw a VERY SMALL gray insect of some sort. They're so tiny they are hard to see. It's great for kids to get to see that there are some living things in the world that are that small. It's a very impressive thing.


After we were all done exploring our dirt we hosed off our tray, bucket, shovel and cultivator and set them out in the sun to dry.

Thursday, April 17, 2014

Phases of the Moon Chalkboard Lesson

Just the other day I bought my daughter a chalkboard (pictured below). It was a great price, $14.99 at Hobby Lobby and I had a coupon. I was shocked that a chalkboard this size was priced so low. I highly recommend going there for your chalkboard needs. Chalk itself is priced good as well.

Now, I'm no artist and I can see that my handwriting didn't look too phenomenal here. But whatever, my daughter still learned something. She's 2 years old and she now knows all about waning crescent and waxing gibbous moon phases (plus all the other ones).
So, you'll need a chalkboard and some white chalk. You could also use a black piece of paper and a white colored pencil if you don't have a chalkboard. There's just something about chalkboards that really says "school" to me. 

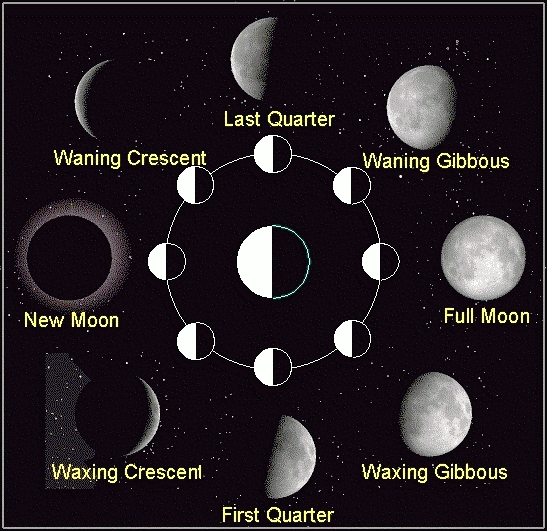
First I wrote "Phases of the Moon" across the top of the board. Then I drew a circle that I wanted to draw my moons around for positioning. I drew the outlines of each first, starting with waning crescent. In case my handwriting is so bad that you totally can't see, there's: waning crescent, last quarter, waning gibbous, full moon, waxing gibbous, first quarter, waxing crescent and new moon. Capital letters are also probably better since they're names. 

Here's the picture I modeled ours after right here

Then after I had all their outlines drawn I colored them in appropriately with the white chalk, using the eraser as needed to help with shaping and outside the lines mistakes.

Then for the information for the lesson that I was telling my daughter while we looked at this chalk board lesson I used these tidbits 

This was a very productive lesson that I'm sure most preschool age children would enjoy. A new way to use something (in this case, the chalkboard) is always kind of interesting to kids.


Saturday, April 5, 2014

Turtle Labeling Activity

This activity that I made with paper, colored pencils, index cards, scissors and a pen is inspired by this Montessori puzzle. My idea with it was to get my pre-reader used to looking at words and to start learning them, as well as teach her about the parts of a turtle. This activity is very easy to put together and can be used with a Pond Animals Theme.
Now, I know I am no Picasso, but I've got to draw these things to the best of my abilities sometimes for DIY home school resources. All I did was draw a turtle on a piece of paper and write "Reptile Turtle" on the paper as the label for the paper. Then I wrote all the parts on index cards and cut them down to size. The parts are carapace, neck, head, claws, plastron, and legs. I have all the labels sitting on and around the turtle in this picture where they're supposed to be.

Wednesday, March 26, 2014

Field Trip to See Flowers

A few important part of homeschooling for preschool is going to fun places that kids will get some knowledge from and enjoy. Plus, it's fun to get out of the house with your kids anyways. This is a great activity for the Spring and Summer months. It's a field trip to see flowers! Seeing the flowers can open up opportunities to many great educational discussions. Colors of flowers, names of flowers, what flowers need to grow, parts of flowers, etc. are all great conversations that could stem from this free field trip. Yes, you heard right, it's also FREE! (unless you end up buying something while you're there) lol.

Look at those beautiful flowers my girl is enjoying! Wondering where to go? We went to the outdoor gardening/floral section of Menard's. You probably have a Menard's or a Home Depot around you, or just a nursery.


Whatever you have near you for viewing flowers, it's definitely worth checking out with your little one.

Saturday, March 15, 2014

Leaf Rubbing Craft

This craft can be done in almost all seasons. It might be especially interesting in Spring when all the leaves are growing on the trees, or in Fall when they're changing colors and falling down. Both times provide great opportunities for some science discussions. In Spring you could talk with your child about how things grow and bloom, and what plants need to thrive, how trees provide oxygen, etc. In the Fall months you could talk about how deciduous trees have leaves that change colors and fall, the roll chlorphyl plays in the coloring of the leaves, etc. No matter what time of year you do this craft you can discuss the veins of the leaves, as they'll appear on the rubbing.

So to set up, all you'll need is:
 - one or more leaves, I like to add a few for variety
- one or more crayons, again just depends on how you want it to look
 - a sheet of white paper


Before we got started I had my daughter come outside with me to pick out the leaves. It was fun for her and got her ready for the craftt he really enjoyed doing her leaf rubbings. To make the rubbings put the leaves under the paper and rub the crayon over the paper. They turned out beautifully!

Friday, March 14, 2014

Safari Animal Prints Play Dough Play

Does your little one love play dough as much as mine does? If so, you're likely looking for new ideas of what to add to play dough play to keep it varying and interesting. This one is a big hit with my daughter and her friend!


It does require a little bit of money and set up, but you likely already have some of what you need, and the rest is optional. Do what you can!

Supplies:
 - Tape
- Animal print crepe paper (I used zebra and cheetah
 - Play dough (I used homemade green)
- Safari Animal Figures (we have the Animal Planet Mother & Baby Play Set but you could easily use other animal figures, from the dollar store or the zoo perhaps).
- For added pretend play fun to make my daughter feel more like she was on a safari she wore a zebra hat and used some binoculars.

As you can see, she was thrilled to see this set up!

How I set it up is as follows:
 1. Use tape to add the animal print crepe paper as a border on my daughter's table.
2. Flatten out our batch of homemade green play dough in the middle of the table.
 3. Place the animal figures around on the table.
4. I set my daughter up with her hat and binoculars and let her get started.


 You can see how she took the animals and made their footprints. I explained to her and showed her an example beforehand. This is a great activity for a little bit of science about animals. We looked at each foot print and talked about it and why that animal has a foot like that for the enviornment they live in.