Showing posts with label Crafts. Show all posts

Monday, October 5, 2015

Have a Great Educational Fire Safety Week

October 4th through the 10th is Fire Safety Week! With the ideas from this post you and your kids are sure you have a fun and informative week learning about fire safety.

First I like to put up a word wall when we do a "theme" or "unit" in our home school, and we always do our fire safety theme during fire safety week. 
I have "Fire Safety Week" on orange paper as the title and then the other labels in orange as well: "signs, use, and do" as in signs of the fire, what firemen use and what firemen do. There's the "fireman" word that I have up there that I printed from a community helpers word wall download. Then all the yellows are what goes with each label. For signs we have fire, alarm, and smoke. For use we have hat, water, hose, fire engine, ladder, hydrant, extinguisher. For do we have put out, and save.


We checked out some great books for this week from the library, fiction and nonfiction:
-  At the Firehouse by Anne Rockwell
- Fire Safety by Lucia Raatma
- Firefighter Frank by Monica Wellington
- Firetrucks by Peter Brady

The book about Fire Safety is a really great one full of tips to get discussions going with your kids about how you guys can avoid fires in your home, and what to do if there is a fire. This sets the stage to practice fire drills in your home, and the stop, drop and roll.

(new watermark over my old blog name)

There are many more exciting things to do for Fire Safety Week than just have a word wall and read books though. Here is a firefighter sensory bin we have done in the past


One of the very best things you can do is tour a fire station. Call your local fire station and ask if you can arrange a tour for your kids, or make it a group thing and go with a group of parents and children. The tour we went on the firemen were really good with the kids and the tour was informative and fun, then they gave all the kids firefighter hats and coloring books. You can even bake cookies with your kids to bring them to the firemen.


Other things to do:
- Shape Firetrucks from Things to Share and Remember, we've made these before!
- Make a firefighter craft from Moms Town Toronto
- Do a fire safety smoke crawl and play some games too like Lalymom 
- Do this F is for Fire craft from I Can Teach My Child 

Friday, October 2, 2015

Monster Juice Boxes

Last year for our Halloween party we decorated juice boxes to look like monsters. Here's how they turned out!

We used lemonade juice boxes from Trader Joe's but you can use any kind of juice boxes your children or party guests will enjoy.

First you have to remove the straws from the backs and make sure you put them somewhere you won't forget so you can serve them with the straws at the party, or just for fun if you're doing this for just your own children.

Now you'll need:
- construction paper, I used a different color for each so nobody got their drinks mixed up and for presentation
- scissors
- glue
- googly eyes, large and small
- a black Sharpie
- clear tape
- pipe cleaners

1. Cut the construction paper down to the correct size to wrap around the juice box, then tape it together in the back.
2. Plan how you want to do the eyes and then glue them on.
3. Draw their mouths on with the Sharpie.
4. Cut the pipe cleaners down to size for their arms and bend them any way you'd like then tape them to the sides of the juice box.
5. Enjoy your monster juice boxes!

Wednesday, August 5, 2015

Beauty & The Beast Rose Inspired Craft

This past weekend we took our daughter to go see Beauty & The Beast the musical at an outdoor amphitheater. It inspired me to make a craft based on it! I did a search on Pinterest for Beauty and the Beast crafts and I wasn't too impressed by the options so we came up with our own. 

I thought about how the rose is an important part of the Beauty and the Beast story and then I remembered buying artificial rose petals at Dollar Tree in February for some Valentine's sensory play. I thought they'd be perfect to make her own process art rose. This art project wasn't about the product of making some perfect rose but more about the process, which is important for kids to explore.

 I had my computer there with a picture of the rose from Beauty and the Beast for inspiration so she could look at it. This craft also gave her an opportunity to work on her gluing skills.

She told me she was putting them on in a "pattern" and she alternated colors as so (pink, red, pink, red, etc.)


 Here's her finished product after a day of drying time. As you can see even though the glue is dried you can still see it's effects in some places. It's beautiful either way, but maybe using a glue stick in the future would be better for this instead of liquid glue.

Wednesday, April 1, 2015

Our Family Foot Book 2015

I feel so bad for taking so long to post this, but it's a time consuming post and I just couldn't get around to it until now! I know I said on IG that this would be up like the night we did it..but yeah, life happens! But, this is an activity that we do annually, every Dr. Seuss Day. 

We make a family foot book inspired by the Dr. Seuss Foot Book. I gather some ideas for footprint crafts from Pinterest, and I come up with some on my own. I use some of the lines from the Foot Book and then come up with the rest. I like to make it rhyme.

This year I put my daughter's foot prints together to make a heart shape and then used a Sharpie to make the outline of a heart around them. I of course wrote the title "Our Family Foot Book 2015."

 I started with "left foot, left foot, left foot" like in the book by doing my daughters left foot print three times in a row on one page.
 Then came "right". My daughter insisted on using "disco paint" for it.
 Then I did the "red feet" line with each of her feet red foot prints.
 I let her pick when she wanted me to do my footprints and she chose me to do the "black feet" line so I did each of my feet in black.
 Then I came up with some lines. I came up with this footprint idea on my own too, "A foot at night" was a blue foot print horizontally on the page like it's laying down. Then I painted some silver stars on it, and a yellow crescent moon next to it. I wanted to give it a night cap but didn't want to risk painting it and messing the whole thing up.
 Then to rhyme with it I did "feet that take flight" The butterfly footprints however were an idea I saw on Pinterest.
 Then we did "mommy has a big foot" with my purple footprint horizontally on the page.
 Then "Charlie has a little foot" in purple horizontally on the page.
She wanted my foot in green for the "one foot"

 Her feet in pink for the "two feet"
 I saw this footprint craft on Pinterest, but came up with the rhymes myself. "An ice cream foot that is super sweet"
 "A rainbow foot that can't be beat." For this one I painted her foot one color at a time in the colors of a rainbow from red at the toes to purple on the heel.
 Saw this footprint idea on Pinterest. "A bird foot going tweet" again, my wording though. Just painted her foot brown, did the footprint, then used some red paint to give the bird a belly, feet, and a beak. Used a Sharpie for the eye once it was dry.
 "A car foot going down the street" I used blue paint for her foot and put it on the page horizontally. Once it was dry I used a Sharpie to give it some wheels, then used silver paint to add to the wheels. Sharpie made the lines for the road, then yellow paint made the dashes on the road and the headlight for the car.
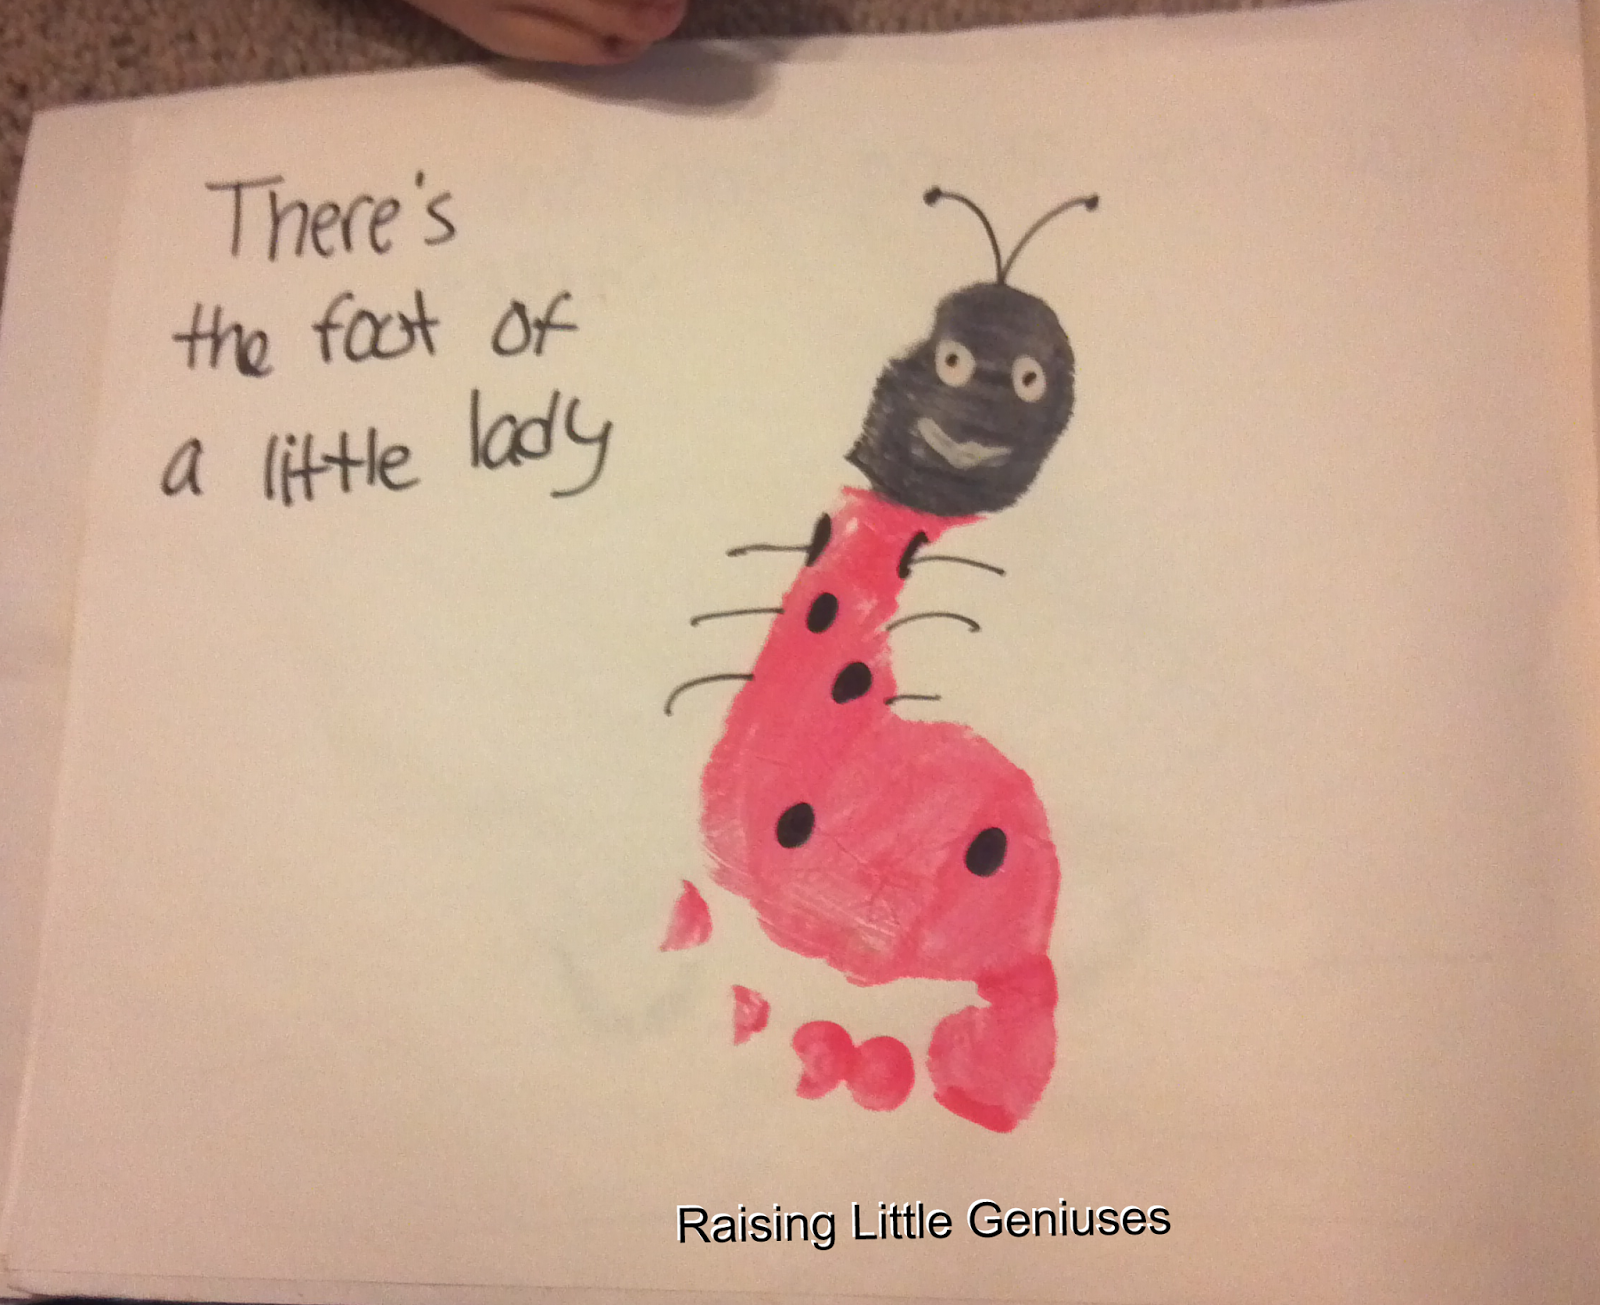
 Saw this footprint on Pinterest, wording is from me. "There's the foot of a little lady"
 "and one that is shady" This footprint was my idea and a really good one, but it was a bad time when I was adding the details to this one so it didn't turn out as perfect looking as it could have. I did her footprint in yellow horizontally on the page, then once it dried I used a Sharpie to draw sunglasses on the foot's "face" used blue paint to make an ocean, brown paint to be sand that the foot was laying on, and red paint to make an umbrella for the foot to be under. Used Sharpie to make some dots on the brown paint to make it look more like sand,
Finally, I did my foot in red and her foot in white on top of mine so it would show up, and wrote "Our families feet are pretty neat"

You'll notice I alternated every now and then as to which foot I was doing prints of so both were represented a fair amount.

After every page was completed and dried I used a glue stick to glue the pages together in twos, in order. Then I stapled all the pages together to make it into a book.


Tuesday, March 24, 2015

Invitation to Create Bunnies

This idea popped into my head one day, with Easter coming up, and I was amazed at how good the set up turned out. I love invitations to create and always love setting up a great one for my daughter. This one was absolutely perfect. I hope you and your kids will have fun with it too!


So, the idea was to set out some bunnies and books about bunnies that had pictures of them. These things serve as the inspiration for the child to make their own bunny or bunnies. I put out our Thumper stuffed animal, a Little People bunny and carrots, a carrot Easter egg, and some bunny books. There was also a Thumper Easter book laying nearby that by daughter ended up choosing to model her bunnies after in the following picture.

So, after I figured out what the inspiration was going to be, I needed to decide what art supplies to put out to give her enough options to get creative with the making of her bunnies, but to also keep with the realistic bunny theme.

I decided on three sheets of construction paper, one in white, one in orange, and one in green. I would have laid out a gray one too if I had one. I picked these colors because I was picturing bunnies on the white that she could color with the crayons, green for maybe some grass, orange for a carrot if she wanted.

I laid out 6 crayons (black, gray, orange, white, green, brown). I chose these for the colors of bunnies, grass, carrots, drawing a face or other details). I'll say now that I ended up needing to get a yellow sheet of construction paper and a pink crayon for my daughter as well for her background, and for the inside of the bunnies ears, per her request. I totally allowed that, as this activity is also very free flow.

I also had out scissors, a small bowl of googly eyes in various sizes, a bowl of cotton balls (think bunny tails), and a bottle of glue. We also needed to grab some qtips to use with the glue, because that's how we like to do it sometimes.

This was her selecting her bunny (Thumper) in the book. It was her idea to also wear the bunny ears during this activity, such a cute addition!


First she took the white piece of paper and the gray crayon and drew the outline of her bunny. I was amazed by it! She cut it out a little bit and then asked me to do the rest because she didn't want it to loose the shape she had designed. I gladly helped, and then she used the crayons to color the bunny the way she wanted to, trying to model it off of Thumper.

Once she was finished coloring the bunny and his ears, we used the green construction paper to make grass for her yellow background. I held the paper for her while she cut little lines on the paper to make it look like grass. Then she glued that on to the paper, then she glued her bunny on to the paper and glued his tail on as well.

She then decided to take the brown crayon and just draw another bunny right on the paper next to her Thumper, she was drawing his sister Daisy. Then I put the carrot inspirations out for her to look at while she drew carrots for the bunnies to have.


Then we made the decision to add the googly eyes to the bunnies because they looked a little funny without them. 
This was the finished product of my daughter's Invitation to Create Bunnies. Beautiful! 

Your little one will have so much fun doing an invitation to create based on bunnies like this! You can put out whatever bunny things you like, including Easter bunny stuffed animals, any books with bunnies in them. You can put out any supplies you like, if you're modeling yours off your Easter bunny collection maybe you'll need pinks and other pastel colors. Just make sure you keep it free flow for your kid to create, and try to let go of trying to control the process. 

Friday, March 20, 2015

Watching the Rain Paint

Watching the rain make beautiful art that they helped to make is such a fun Spring activity for kids.


When it's about to rain you go outside with a piece of white paper and some food coloring bottles and let your little one put some droplets of color around the paper. Then go inside, watch it rain on the paper and make beautiful art!

Monday, March 16, 2015

St. Patrick's Craft

I love this craft I made with my daughter the other day! It is so cute and gets kids in the holiday mood for St. Patrick's Day!


For this craft you need washable tempera paint in all the colors of the rainbow, and black for the pot of gold. Then you need gold glitter glue, construction paper (I used gray so all the colors of paint would show up). I also used a sticker of a leprechaun that came in a pack from Dollar Tree, as well as a circle sponge paint brush.

First, paint the black pot on the paper, or have your child do it. Then instruct them to dip the circle sponge paint brush into each color, one by one (you'll have to rinse it in between) and then put them in arching rows like a rainbow coming out of the pot.

After that the black pot should be pretty much dry, and your child can use the gold glitter glue to top the pot off with! Then the sticker can be added as well if you have one.

Thursday, March 5, 2015

Glitter Hot Air Balloon Craft

As part of our transportation theme we made this Glitter Hot Air Balloon Craft. It looks so cute hanging in our classroom/playroom. 

To make it you need:
- a paper plate
- hole puncher
- yarn
- glue
- glitter
- paper cup
- tape
- scissors
- a puppet of your child (you make a puppet of your child by cutting out a picture of them, and taping a popsicle stick to it

Step 1:
Punch a hole in the top of the paper plate so you can put some yarn through it. Use enough so you'll be able to hang it down from the ceiling, taping it to the ceiling and tying it around the paper plate's hole. You can also tape it down to the paper plate for more security.

Step 2:
Punch a hole in each side of the paper plate, and do the same for the paper cup you'll be able to hang the paper cup from the paper plate. You can tie the yarn around the holes and then tape it for extra security like you did with the plate.

Step 3:
Smear/squeeze glue all over the paper wherever the glitter is wanted. Shake the glitter over top of the plate, trying to get most on the glue, then shake paper plate over the trashcan to get the excess glitter off. Set on the counter or somewhere to dry.

Step 4:
Once it's all dry, put the puppet of your child into the paper cup. Use the popsicle stick to poke a hole through the bottom of the paper plate and stick the puppet down far enough into the paper plate until it looks normal for this craft.

Step 5:
Tape it to the ceiling if you want!

Wednesday, January 21, 2015

MLK Day Equality Craft

Equality should be taught to children all throughout the year, but on MLK day it's always nice to talk about what a great man Martin Luther King Jr was and what his dream was, and work in a lesson on equality. In addition to reading some books and having a discussion, we did this craft.


It's a collage of all different kinds of kids from magazines we had. Not only are the kids of various nationalities, but we also talked about other differences people can have and got some of varying hair and eye colors as well.

Not only was this obviously a great lesson in how all people have their differences but are all equal, it was also good fine motor work. My daughter is a pro at cutting and gluing by now, but for kids just starting out with these skills it's great practice.


And the greatest part, she was so proud of it!


Thursday, January 15, 2015

Josef Albers Inspired Art Squares

Firstly, I would like to make it known that I'm not taking credit for this idea. It was something my daughter got to do at our local library. I'm pretty sure it was an idea given by a book about Josef Albers art, but the librarians may have came up with it, and they put it together. I'm not really sure, but it was way too good of an idea not to share.


If you're not familiar with Josef Albers you should read up on him on the internet with your child, or see if you can rent a book about him from your local library. He used a lot of different colored squares for his art works, putting them together all different types of ways. He noticed how colors look different when placed on top of other colors.

I think this is a FANTASTIC color lesson for kids already have all their colors down. For those that don't, you can use it to teach them what colors are what too of course. But if you can really get your child thinking about how colors look on top of different colors that's so great!

You'd need to provide:
- A large sheet of white paper
- Big squares of several different colors of construction paper (enough to fill up the entire sheet of white paper, using every color just once)
- Little squares of the same colors of construction paper (the same amount as the big squares)
- A glue stick

Let them play around with it for a while until they get the design they love and connect with. Have discussions about how certain colors "pop" when placed on top of other colors, or how they "blend in." Good color terms to get kids familiar with. Once they have a design they like they can glue it down, or you can just glue down the big squares and leave the little squares paper clipped to the top to do over and over again.

Fine Motor Valentine's Cards

Valentine's day is right around the corner, and when your little one has lots of loved ones in their life it's best to get started on the Valentine card making early so in case they only want to make a few at a time there's no rush. However, when making these Valentine's cards your kiddos will probably want to go on for quite some time. I know mine did! 

These are great for fine motor skills, fun for kids (since every little one I know LOVES stickers), frugal to make a lot of, and cute cards that people will love receiving 

All you need to buy is two things from the Dollar Tree: a pack of construction paper, so you can use the red paper, and a package of different colored and sized craft foam heart stickers. Your little one will use their fine motor skills to peel the papers off the craft foam so they can stick them to their paper. They will be creative while they design the Valentine's any way they want. This is a time to praise them for their creativeness and efforts to make cards for other people. We made a list of who we needed to make cards for first so we could keep track and also because I wanted my daughter to think about who she was making each one for as she was making them.


Like I said I let my daughter get creative and design these however she wanted without intervening because they were her cards she was making for her loved ones. We do plenty of educational activities at all other times. However, if you want to work on colors, numbers, big vs small, patters, etc. you could use these hearts to do so with conversation while making them.

Here's how the ones she made turned out. I think they are so creative and beautiful. 

You can see I cut the pieces of construction paper in half as to make more cards, make our hearts go farther, and it just seemed nicer to send that size so people could put them on display easier. I also used a few pieces of pink printer paper that we had lying around in addition to the red construction paper so she could have options.

Friday, August 8, 2014

Name Caterpillar Craft

This is one of my favorite crafts we've ever done. It was so educational and fun for my daughter! Not to mention all of the fine motor strengthening parts of it. We did it when she was about 18 months old. Here's what the finished product should look like.


What you'll need:
- A piece of white card stock paper
- Orange construction paper
- Green construction paper
- Scissors
- Sharpie marker
- Glue (Elmer's makes great glue pens, you could also use regular glue bottles or sticks)

First take your orange sheet of construction paper and draw a circle on it for the caterpillars head and write the first letter of your child's first name in it. Next, use the green construction paper and repeat for the rest of the letters of your child's name, with a bit smaller circles.

Next, help your child cut out the circles or let them cut them out themselves depending on where they are at with their scissor skills. At 1.5 here I was doing a lot of the cutting with my daughter, and now at 2.5 she barely needs my help at all.


After all the circles are cut out instruct your child to put glue on the backs of them all. This is great for their fine motor skill development, as was the cutting.


Last, give your child the white sheet of paper and show them how to put the circles down on the paper. Help them to put them all in the right order. During this time discuss all the letters and how they are the letters that make up their name. Sound them out individually, together, and say the name a few times. Ask them to repeat after you. Very educational!