


Thursday, May 1, 2014
Homemade Apple Fusion Juice
If you've got a juicer at home and love making homemade juice for your tot, I highly suggest trying this one!
I call it Apple Fusion Juice because it has two different kinds of apples in it. 1 Golden Delicious and 1 Pink Lady. Our preference is to use organic produce, so we did. We also only used 1 of each apple which made about 4oz of juice. If you've got more than one child or want a big glass yourself you may want to use more apples.

Thursday, April 17, 2014
Phases of the Moon Chalkboard Lesson
Just the other day I bought my daughter a chalkboard (pictured below). It was a great price, $14.99 at Hobby Lobby and I had a coupon. I was shocked that a chalkboard this size was priced so low. I highly recommend going there for your chalkboard needs. Chalk itself is priced good as well.
Now, I'm no artist and I can see that my handwriting didn't look too phenomenal here. But whatever, my daughter still learned something. She's 2 years old and she now knows all about waning crescent and waxing gibbous moon phases (plus all the other ones).

So, you'll need a chalkboard and some white chalk. You could also use a black piece of paper and a white colored pencil if you don't have a chalkboard. There's just something about chalkboards that really says "school" to me.
First I wrote "Phases of the Moon" across the top of the board. Then I drew a circle that I wanted to draw my moons around for positioning. I drew the outlines of each first, starting with waning crescent. In case my handwriting is so bad that you totally can't see, there's: waning crescent, last quarter, waning gibbous, full moon, waxing gibbous, first quarter, waxing crescent and new moon. Capital letters are also probably better since they're names.
Here's the picture I modeled ours after right here
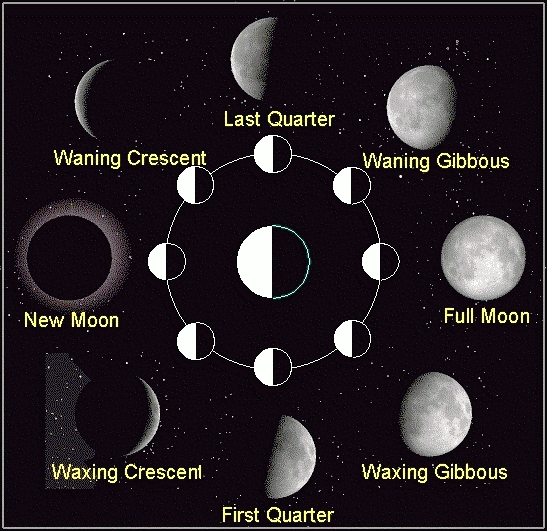
Then after I had all their outlines drawn I colored them in appropriately with the white chalk, using the eraser as needed to help with shaping and outside the lines mistakes.
Then for the information for the lesson that I was telling my daughter while we looked at this chalk board lesson I used these tidbits
This was a very productive lesson that I'm sure most preschool age children would enjoy. A new way to use something (in this case, the chalkboard) is always kind of interesting to kids.
Wednesday, April 16, 2014
Easter Sensory Bin
We're definitely gearing up for the Easter holiday here! Here's our Easter Sensory Bin for this year.

Then I added some really simple things. Though it was simple my daughter (at 2 years old) still really enjoyed it. I added a stuffed animal bunny, some plastic eggs in different designs, and a windup chick.
"Jesus Loves Me" Easter Squish Bag
First in this post I just want to say that we are not a family that is religious connecting with Catholic or Christian religions. However, I'm going to educate my daughter on all religions and let her choose the one she connects closest with. So, as a part of educating her on all holidays, I do tell her what Easter and certain other holidays are "really" all about. She thinks all the crosses and Jesus stuff is adorable and it's very innocent letting her play with this squish bag and talking about the "real" meaning of Easter originally. Whether your family is religious or not, if you're homeschooling, it's still important to discuss all of this at some point, especially since it is what a lot of people believe in. We'll discuss in way more depth once she's middle school to high school aged. Anyway! Here's the "Jesus Loves Me" Easter Squish Bag that I made for her!

It is super cute!
To make a squish bag like this for your little one you'll need:
- A Ziploc bag (I used sandwich sized)
- Craft foam "Jesus Loves Me" hearts and crosses. You may be able to find the sticker kind, or the kind that's just foam at your craft store. Either one works fine, we used some of both in ours.
- Clear hair gel (can be purchased at Dollar Tree)
- Yellow food coloring
- Masking tape
Step 1:
Squirt enough clear hair gel into the Ziploc bag. It's really your call, you'll have to feel around with it. There's no exact measurement. Once you've got enough add in some drops of the yellow food coloring and mix that around with your fingers. Be careful, too much yellow food coloring turns to orange very, very quickly!
Note: during this step don't get the part where it zips shut wet with hair gel or you'll have a harder time sealing it up when finished. You can zip it shut when mixing and be careful to not squish the gel up to the very top during.
Step 2:
Open the bag and add in the "Jesus Loves Me" hearts and the crosses. You can stick them in to the hair gel a bit, or just lay them in there. Then zip the bag shut and move them around a bit.
Step 3:
Put some masking tape around the top and bottom of the bag so it can't be opened or get a hole on one of the bottom corners.
Step 4:
Give it to your little one! Show them how to squish it and move the objects around with their fingers. This will hone their fine motor skills.
How To Make Pet Rocks
Aren't these adorable little friends to make as a fun Spring or Summer outdoor craft? Not only are they cute, they can also help kids become ready to have a real live pet. Pretending to take care of these can teach some responsibility and make kids feel like they're doing something important.

- As many rocks as you want
- Glue
- Googly eyes
We picked a few rocks we thought would make cute pets from our backyard, and then we glued some googly eyes to them. It couldn't be more simple to put them together. My daughter loves to see them on display in our classroom/play room and check on them often!
Monday, April 14, 2014
Zoo Bath
This bath is a great addition to a zoo animals themed week or lesson plans. It doesn't take too much time to put together either!

You will need:
- Neon green food coloring
- Black crepe paper
- Black construction paper
- Tape
- Scissors
- Shaving cream
- Plastic containers
- Makeup brush or paintbrush
- Neon blue food coloring
- Green food coloring
- Animal paper cut outs from Dollar Tree
Fill up the tub with water and color it with neon green food coloring.
Cut strips of black crepe paper down to size for the outside of the tub area and tape them to it to look like cage bars at the zoo.
Cut out the word zoo out of black construction paper and tape it up in between the bars like I did in the picture.
Tape up the animal paper cut outs on the shower wall. Then make bath paint in green and neon blue, and paint little areas of grass or water underneath the animals for their habitats.
Wooden Bead Sensory Bin
Wooden beads are a really great loose material that provoke imaginative play. I chose to put them in a sensory bin for this activity and gave my daughter a spoon and a bowl beside it. She got right to transferring the wooden beads! You can purchase wooden beads at Michael's.

Subscribe to:
Posts (Atom)