Friday, May 29, 2015

Lemon Jello Sensory Play

As I've said before I really enjoy jello messy sensory play in the summer time because it's fun to take outside and beat the heat with. Having cold sensory materials to touch outside in the sun helps to cool kids off just like water play. This sensory play stimulates more than just one or two senses too, it stimulates three, and maybe even four or five depending on what you choose to do with it! If you're okay with your little one having jello they could sample the taste while they play, but I didn't let my daughter eat any of it. We use jello just for playing! 


Children learn better when they are using more than one sense. The bright yellow colors, the cold and giggly feel of the jello, the scent of the lemon, all stimulate the senses and help children remember concepts. You can talk about how many lemons there are in the bowl, or if you're trying to teach colors to your young toddler this works good for that too. Enforcing those concepts with sensory play is wonderful to help them learn and remember the knowledge.


 My little one really enjoyed this sensory play a couple of summers ago!

You can make this for your little ones too and here's how:
1. Get a big bowl and prepare lemon jello according to the directions on the box and then put it in the bowl to set. You can add some artificial lemons in before or after it sets, either way!
2. Bring it outside to play!


Messy Jello Math Play

One of my favorite sensory materials for my daughter to play with outdoors in the summer is cold jello! I especially like to put things into the jello before it sets. Seeing that is a very cool experience for kids, and if they've never seen it before (and even if they have) they're sure to be delighted. This messy jello sensory play incorporates math because there is magnetic numbers in it. The math part of it can be changed up for different ages. Such as learning numbers, or putting them in order for toddlers, and addition or subtraction for preschoolers. 


You can see from the picture above and the picture below that it starts out looking all smooth and set and then quickly gets giggly and wiggly. The best part is that the kids get to be the ones to make it that way. It's a really neat sensory process for them to experience.


Neither of us can keep our hands out of messy sensory play.


To make this you'll need:
- a box of jello mix (any color)
- magnetic numbers
- a big bowl
- maybe another big bowl for transferring if your kiddo always ends up doing that

Just make the jello according to the directions on the box and then before you put it in the fridge to
set add in the magnetic numbers. This jello
can be saved and played with a few more times
before being tossed out.

Thursday, May 28, 2015

Shaving Cream & Ice Weather Sensory Bin

I couldn't decide which picture to use for this so I am using both! Neither picture does justice to how cool the lightning bolt shaped ice cubes really looked!


This sensory bin is a messy play bin that's perfect for outside in the summer heat to cool off with. It also can be part of a tot school or preschool weather unit.


Shaving cream and ice is really one of the funnest combinations of sensory play materials that there is. Squeezing an ice cube through a shaving cream covered hand is a very unique feeling, and on a hot summer's day helps to cool the kid (and you, I know I can never keep my hands out of it!) down.

To make this bin you'll need:
- shaving cream from the dollar store
- neon blue food coloring
- a lightning bolt ice cube tray. The one I have seemed to be sold out online, but here's a link to a similar one
- yellow food coloring (the more you use the more orange they will look, so watch out for that)
- a bin of course, and a spoon or paint brush or something to mix the blue food coloring into the shaving cream

Step 1:
Fill up the lightning bolt ice cube tray with some water, and then add in a couple drops of food coloring to each slot and mix it in a little bit with a spoon or something small so the color will spread throughout the water, dying the whole ice cube.

Step 2:
Once the ice cubes are frozen (leave them in the freezer) and fill up a bin with shaving cream, squirt in quite a few drops of neon blue food coloring and mix it in.

Step 3:
Pop the lightning bolt ice cubes right out onto the shaving cream right before you're about to play with it, so that way you can get the most use out of it before they melt. It's very fun!


Messy sensory play is so important and so much fun in the summer!

Wednesday, May 27, 2015

Visiting a Memorial With Children

Memorial Day was the other day and I took my daughter to a beautiful Memorial to remember the lives that were lost fighting for our country. It was a really good experience and educational time for my daughter to learn a bit about history, and to do something for someone else and be giving. Remembrance is really important to me and I want that to pass on to my daughter.


This is my favorite picture I got, I love how you can read the memorial and it's really touching and something she'll have forever.

In the days leading up to Memorial Day we talked about how we were going to go put flowers down for the people who lost their lives fighting for our country and my daughter sweetly said "can we put one flower for every person who died?" So talking about the aspect of death wasn't scary to her, and she was all for remembering the amazing heroes. I know a lot of people worry about their kids thinking about death and opt out of talking to them about this holiday, or taking them to a memorial or cemetery. I just want to say I don't think that should be a thing to be afraid of when it comes to this. I think it's the right thing to do to educate our children about this holiday.

I liked having my daughter put the flowers down and leave them because it was a way for her to connect. She also loves flowers so she enjoyed picking them out, and even wanted to pick them in patriotic colors, which I was very proud of. We asked for the flowers to be tied together with some ribbons, and she asked for a pink one to go along with the patriotic colors. I think it's important for them to put their own touch on it, it makes them more a part of the experience. We ended up separating the flowers though because there was three different memorials at the place we went to and we wanted to honor each.

 She was looking lovingly at the first memorial we came to.

Putting a flower at this one and talking about her great grandparents that fought in this war.

By the smile on her face you can tell that this was made a very positive experience which is important for young kids who are jut getting used to the big concepts that are a part of Memorial Day. I loved seeing my daughter have this sweet experience remembering our fallen soldiers. Don't be afraid to do the same with your children.

Sunday, May 24, 2015

Painting Bird Houses

One of my favorite Spring activities to do with my daughter is paint bird houses. They make such a cute decoration for indoors or outdoors in the Spring time, and if you put them outside you just might get to see some real birds hanging out. Observing nature is always fun for kids, and being outside enjoying nature actually reduces stress levels in kids. 


This is the first bird house my daughter painted. I purchased both of the wooden bird houses from Michael's. They had varying sizes, ones with hooks and ones without. The choice is yours. I wanted to keep ours inside so the hanging factor didn't matter much to me, but if you want to put yours in a tree you may want to opt for that.

If you're interested in the paint smock it's also from Michael's, and the flower paint tray is from Hobby Lobby.


I let her pick the colors she wanted, squirted them in her paint tray, and let her get to it. I emphasized covering the whole thing in paint and made sure to ask her if she wanted other colors for other parts and we talked about how she was designing it.


Then she painted a littler one, and she asked for white paint, metallic purple, and sparkly party paint (all tempera paints from Michael's). They made a beautiful combination.

If you're wanting to put your bird houses outside you'll probably want to spray them with some sort of finishing spray to help the paint stay on.

Friday, May 22, 2015

Frog Life Cycle Pond Sensory Bin

As part of our Habitat Series we're doing right now we are doing a unit on the habitat of the pond. Frogs live in ponds, and knowing the life cycle of a frog is important animal knowledge. So I made this sensory bin/small world that shows the life cycle of a frog in a cute and interactive way. Kids can play with it while learning and experiencing fun tactile sensory materials. 


To make this sensory bin/small world I first made a batch of blue homemade playdough to represent the water. My favorite homemade playdough recipe goes as follows:

1 cup of water
1 cup of all purpose flour
1/4 cup salt
1 tbsp oil
1 tbsp lemon juice
blue food coloring (for this batch)

Mix them all together in a pot with a wooden spoon and then put it on the stove on medium heat and stir it constantly until it forms a ball, transfer it to a bowl, knead it until it is no longer sticky once it is cool enough.

Now, to make the bin look like the pond how I wanted I put the blue playdough down into more than half of the surface of the bin, stuck some small rocks into the edge for a border, and then poured some dry split peas into the remaining surface area of the bin. After that all there was to do was to put the life cycle of a frog pieces into the bin. I also added a little plastic fly we have to discuss how frogs eat flies. We also watched a video afterwards of a frog eating flies to connect the concept and make it more real.

You can buy the frog life cycle here  to make this bin or to use for your own educational activities.

Make sure you interact with your child(ren) as they play with this bin and explain the stages of the frog life cycle and the differences between each. Every day of the pond unit after we did this bin I am having my daughter show me the frog life cycle in order on her own.

Wednesday, May 20, 2015

Magic Tree House Dawn of The Dinosaurs Themed Bath

Every evening now I read my daughter a couple chapter books every night and we've started the Magic Tree House series. I decided to make my daughter a bath themed on the first book Dawn of the Dinosaurs. She really enjoyed it and thought it was really cute! The pictures aren't the greatest, the lighting was bad but you'll get the gist. 

I wanted the bath to be like when Jack and Annie are in dinosaur time, and that involves the tree house being in the background. It's also what provided a lot of pretend play for my daughter. So I made some brown bath paint with some shaving cream and washable brown tempera paint and painted the tree house on the wall as closely as I could to how it looked in the book. I also painted some trees around it. I made green bath paint for the tops of the trees with some neon green food coloring and shaving cream. For the ladder to the tree house I just used plain black washable tempera paint and a small paint brush to get them on there over top of the brown bath paint tree house.

I had the water neon green too but like I said the lighting was bad and colors didn't come across very well.

As you can see in the above picture I added a couple plastic dinosaur figures of dinosaurs that are in the book. Tyrannosaurus Rex and Triceratops.


I also wanted to add some more concepts from the book, to make the bath more realistic and give it all that more detail for the pretend play. So with golden craft foam, scissors, and a Sharpie I made the letter "M" medallion that Jack found in dinosaur time, and with a piece of purple craft foam, scissors and a Sharpie I made a little rectangle for "Jack's Journal" where he writes down the information he gathers.

Sensory Farm Small World

If you're looking for a sensory bin that includes some pretend play small world fun this is a great one. It's particularly great for a farm tot school or preschool theme. 

For this bin you will need:
- cornmeal
- baking soda
- water
- lemon-lime koolaid mix
- rocks
- some little people or other plastic farm animals, a tractor and farmer too if you can

First you'll need to make the dough by filling a bowl with the amount of baking soda you want and then very, very gradually adding water and mixing it together until it forms a dough that you can make into a ball and crumple again. Too much water will result in it just turning into liquid.

Once you have that dough made you can add some to the bottom of one half of a sensory bin, then put a row of rocks on it and pour some cornmeal on the bottom of the other half.

Then all you need to do is add in the animals and other things.

Saturday, May 16, 2015

Healthy Bento Lunch

I love love love doing Bento for my daughter. Here's a simple idea for a quick healthy lunch (well the nuggets aren't as quick as everything else, but in our case they were leftovers from dinner the night before).
In the first section I have a salad of organic romaine lettuce, chia seeds, and Marzetti Simply Dressed Light Raspberry Acai Vinaigrette.

In the next section I have some organic baby carrots.

And in the last some chicken nuggets from this recipe  with some organic ketchup to dip.

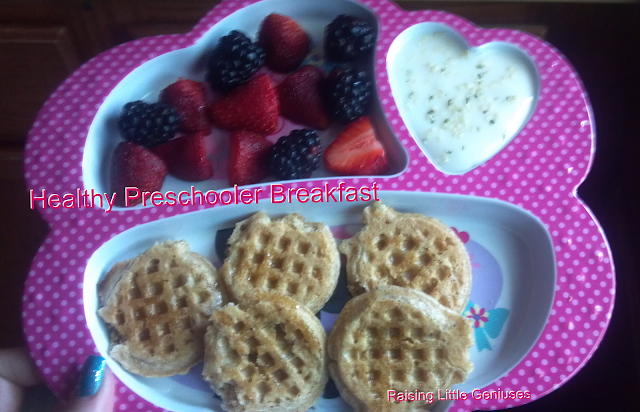
Healthy Preschooler Breakfast


A healthy breakfast is a great way to start the day before some homeschool preschool lessons (or going off to school). Here's an easy idea for a nutritious meal!

Earth's Best Organic Homestyle Mini Waffles topped with vegan butter and amber agave.
Fruit: blackberries, and strawberries
Vegan yogurt topped with hemp seeds

Delicious and nutritious and sure to be gobbled up the the kiddos!

Friday, May 15, 2015

Star Wars Bento

So, I'll say right away that this isn't perfect by any means. My food pen got messed up a bit with the bread for Yoda's face, but my daughter didn't care and thought it was adorable. That's how kids are! :)  

I made this Star Wars Bento for my daughter on May the 4th and told her (may the forth be with you). So this is a bento that's great for a fun way to spruce up lunch on that holiday, but many kids would love to see this in their bento box anytime of the year.

For the Yoda sandwich I lightly toasted two pieces of bread, and then put them on a chopping mat and used a sharp knife to very carefully cut out the shape of his head. Then I put some nut butter and jam on it and closed it up. I got out my green food pen and tried my best to give him his facial features to make him look more like Yoda.

I also made some light-sabers for her dessert and added them into the bento box. I put two in a compartment by themselves, but also two next to Yoda. To make the lightsabers you just need some pretzel sticks (I used Glutino Pretzels), and some vanilla icing and food coloring in the colors you'd like (I used neon pink and neon green per my daughters request). All you do is put a little bit of the icing into two small bowls and then add in a few drops of the food coloring to each, stir it in, then roll one half of the pretzels through it. And you have lightsabers. As you see I crossed them over each other. I also put the folded up paper towels and put them under the sandwich and cheese words so they'd be higher up and visible for a picture and more ascetically pleasing for my daughter.

For the cheese words that say "Star Wars" I used a piece of dutch goat cheese and these cutters 

Then I just threw in some fruit (strawberries and raspberries), could be anything.

And there you have it, it's that simple!